In this post, I will share 10 ways to make your data collection for mobile apps easier and smarter. This would save the time you invest in iterating over and over again to collect correct and meaningful data. After all, “A stitch in time saves nine”.
From a programmer’s perspective, data collection on an abstract level involves only three steps,
- Finalize what data you need to collect
- Identify the events(triggers) that would be useful in capturing data
- Write some program to send the captured data to the database.
Basic steps every tracker of the mobile app needs to take:
- List down the screens your app has and the events associated with them.
- In the source code, identify the triggers for the above-mentioned screen views and events.(For screen views it would be Activity.onStart() and Activity.onStop() methods. While for the events it would be one of the Input event listeners, of which few are listed here)
- Now we would have short code snippets so as to send the data to our database.
The database referred to here can be anything, either your own custom service implemented to collect data or some popular analytics service such as Google Analytics, Omniture, or Piwik.
Now we will see how to implement Google Analytics for a sample Android app.
There are basically two ways to send data in Google Analytics from a mobile app, either using Google Tag Manager or using Google Analytics SDK.
Both of these require you to include an SDK library from Google.
Integrating the Google Analytics SDK (GA-SDK) requires you to follow the steps below,
While the Google Tag Manager does the same thing as the GA-SDK, it acts as more of a middleware with everything being sent to the data layer. The tag manager acts as a middleware between your application and Google Analytics. Your application pushes each and every user interaction data to the data layer. The data layer is then evaluated/parsed by the tag manager based on the predefined/user-defined macros and tags are fired based on the rules.
The prerequisite for using GTM for tracking user interaction is that you should have GTM integrated into your app, which involves you creating a GTM account and opening the default container.
In the implementation, the differences between Google Analytics and Google Tag Manager :
- the code snippets of EasyTracker would be replaced by the DataLayer.push()
- the UA-ID is replaced by GTM-CONTAINER_ID
- the UA-ID is specified in the Tag Manager Web Console
The steps to send a ScreenView to Google Analytics via Google Tag Manager involve the below 4 steps
- Create a Screen Name Macro
- Create an OpenScreenEvent Rule
- Create a UA App View (Screen View) Tag
- Update Code to Push Event and Screen Name to Data Layer
Lets move on to some of the smart ways to have a full proof data collection methodology.
#1 Screen Views
The EasyTracker methods take the Activity context as an argument and hit GA with the full qualified name of the Activity. e.g. FeatureOne activity would be seen in the Screen view reports as com.example.main.FeatureOne
Such reports would expose your application package names which are undesirable and the reports get messy too with such long names.
To avoid this in the analytics.xml add a string resource name for each Activity in the below form.
e.g.
<string name=”com.example.main.FeatureOne”>Feature One</string>
<string name=”com.example.main.FeatureTwo”>Feature Two</string>
Also, in your app, you might have certain reusable activities that load content based on the Intent parameters they are provided. Say for an e-commerce app, the product page activity would show the product based on the id it is provided.
In such a scenario it would be appropriate to send a custom Screen Name instead of a static Screen Name, i.e. Appending the product name/id to the static Screen Name. For this, you need to invoke the EasyTracker method with a custom Screen View name.
EasyTracker.getInstance(this).activityStart(<screen-name-with-product-name>)
#2 Tracking interactions with respect to visitor id
You can always track user interactions anonymously by assigning a random visitor-id to each user. Tagging users with the visitor id would give you a detailed analysis which would be an added advantage while fulfilling your user’s requirement.
Below is a utility class for generating a visitor id and persisting it across users’ multiple sessions.
public class Installation {
   private static String sID = null;
   private static final String INSTALLATION = "INSTALLATION";
   public synchronized static String id(Context context) {
       if (sID == null) {
           File installation = new File(context.getFilesDir(), INSTALLATION);
           try {
               if (!installation.exists())
                   writeInstallationFile(installation);
               sID = readInstallationFile(installation);
           } catch (Exception e) {
               throw new RuntimeException(e);
           }
       }
       return sID;
   }
   private static String readInstallationFile(File installation) throws IOException {
       RandomAccessFile f = new RandomAccessFile(installation, "r");
       byte[] bytes = new byte[(int) f.length()];
       f.readFully(bytes);
       f.close();
       return new String(bytes);
   }
   private static void writeInstallationFile(File installation) throws IOException {
       FileOutputStream out = new FileOutputStream(installation);
       String id = new BigDecimal(Math.floor(Math.random() * 1000000) + new Date().getTime()).toString();
       out.write(id.getBytes());
       out.close();
   }
}
This generates a random number of 13 digits sufficient enough to identify a lot of users individually,
String id = new BigDecimal(Math.floor(Math.random() * 1000000) + new Date().getTime()).toString();
The only public method here is the id() which would create a random integer when called for the first time. The random id() is stored in a file named INSTALLATION and returned for subsequent calls.
For doing the above, you need to add a WRITE_EXTERNAL_STORAGE permission to the Manifest file.
<uses-permission android_name="android.permission.WRITE_EXTERNAL_STORAGE" />
NOTE:- Limit your visitor id length according to the tools you would use for performing the data processing and analysis.
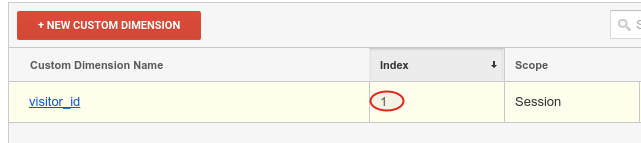
#3 Visitor Id in Custom Dimension
The mobile app analytics from Google only supports Universal Analytics tags. There is no support for a custom variable, instead, we have custom dimensions that can be used. Create a dimension for the visitor id and send the random number generated in the app.
EasyTracker easyTracker = EasyTracker.getInstance();

// Send the custom dimension value with a screen view.
// Note that the value only needs to be sent once, so it is set on the Map,
// not the tracker.
easyTracker.send(MapBuilder
   .createAppView("Home screen")
   .set(Fields.customDimension(1), Installation.id(this));
   .build()
);
Here, the argument to Fields.customDimension(index) is the index of the custom dimension.
#4 Measure your campaigns
If you are running campaigns for your apps then you should know which campaigns and traffic sources are sending users to download your app from the Google Play Store.
Only two changes you would require for this to work,
- Add the following lines to your Manifest file
<!-- Used for Google Play Store Campaign Measurement-->;
<service android_name="com.google.analytics.tracking.android.CampaignTrackingService" />
<receiver android_name="com.google.analytics.tracking.android.CampaignTrackingReceiver" android_exported="true" />
 <intent-filter>
   <action android_name="com.android.vending.INSTALL_REFERRER" />
 </intent-filter>
</receiver>
- Adding campaign parameters to the Play Store URL for all your campaigns. The Url Builder would be useful for this.
#5 Installation date
In certain use cases knowing the installation date would be really important. For this, a specific event for the same can be sent to Google Analytics. A small change in the Installation utility class would do the trick. Here, a custom dimension for the Installation date can also be created.
public synchronized static String id(Context context) {
       if (sID == null) {
           File installation = new File(context.getFilesDir(), INSTALLATION);
           try {
               if (!installation.exists()){
                   writeInstallationFile(installation);
EasyTracker.getInstance(this).send(MapBuilder
     .createEvent("Install Date",
                  ,readInstallationFile(installation)  // Event action - Visitor Id
)
     .build()
  }
               sID = readInstallationFile(installation);
           } catch (Exception e) {
               throw new RuntimeException(e);
           }
       }
       return sID;
   }
#6 Things to keep in mind while setting up tracking ID
Track different apps in separate properties.
Operating System is a default dimension in Google Analytics. Tracking different platforms of an app in the same property. You might want to create different Views filtered as per the operating system.
App Version is tracked as a dimension in Google Analytics. So, track different app versions in the same property. (This would facilitate comparing the reports of earlier versions of wrt to the latest build )
#7 GTM Binary Container
You can always download the latest binary container from the Web Console and save it in your application. This would allow you to see tags being fired in Google Analytics Real Time.
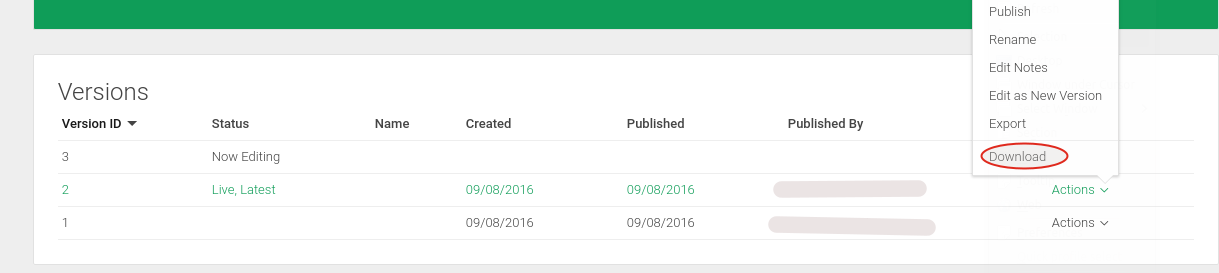
#8 Versioning of container
Set up one container per mobile app. Each new major version of your app should have a new container. Minor updates to an app can use the same container
#9 Testing your app
- For testing purposes, you can use the Google Analytics Realtime feature. Apart from this, you can set the Google Analytics Log Level to VERBOSE and use the log for debugging purposes. The sample log file would be as in the image below –
![]()
- If you do not want testing data to appear in Google Analytics reports you can set a “Dry Run” flag in the SDK,
GoogeAnalytics.getInstance(this).setDryRun(true);
(When a dry run is set, hits will not be dispatched, but will still be logged as though they were dispatched.)
#10 Miscellaneous
Lastly, after all, your implementation is done either via Google Tag Manager SDK or Google Analytics SDK, you need to update the app on Market Place. Some of the points to bear in mind are as below,
- Once you have inserted the data collection code snippets in your application you need to push an update to the App Market for users to download. The data would be collected for the users who download the new build and the users who update their applications.
- The cycle of pushing an app update is required after every change you make to your source code, so identify every feature of your application and start collecting data for it in the first update itself.
This was all about tagging your mobile app. There are many other features of Google Tag Manager for Mobile Apps, and many more are to come. Google has now released content experiments for Mobile Apps. Stay tuned for more updates about Google Tag Manager and Google Analytics.