Universal Analytics is the new operating standard of Google Analytics. It has a new tracking code (analytics.js) which is completely different from than classical Google Analytics Code (ga.js) and has been rebuilt from the ground level. Everything from event handling, eCommerce tracking, cross-domain tracking, etc. is handled in an improved way. The following guide will show you how to upgrade your web property & custom tracking codes to Universal Analytics.
The Guide is divided into five chapters which are as follows:
Chapter 1: Introduction: Universal Analytics
Chapter 2: What’s New in Universal Analytics
Chapter 3: How to Upgrade to Universal Analytics
Chapter 4: Six Tracking Codes You Need to Upgrade
- Event Tracking Code
- eCommerce Tracking Code
- Cross Domain Tracking Code
- Custom Dimensions/ Metrics Code
- Virtual Pageviews Code
- Demographic & Interest Tracking Code
Chapter 5: Commonly Asked Questions (Video)
Chapter 1: Introduction to Universal Analytics
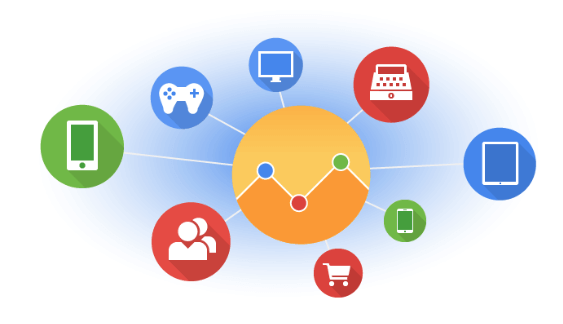
Universal Analytics which came out of beta on 2nd April 2014 is the new version of Google Analytics It introduces a new tracking code, the ability to track a user’s behavior among different devices, and a new measurement protocol that is able to import data from online and offline devices.
The new Universal Analytics is more focused on the user level or customer level compared to the visit level.
As Justin Cutroni puts it “The cornerstone change in Universal Analytics is that Google Analytics is becoming user or customer centric rather than visit centric. This paradigm, sometimes called customer centricity, more closely aligns with how businesses traditionally measure their performance.”
Chapter 2: What’s New in Universal Analytics:
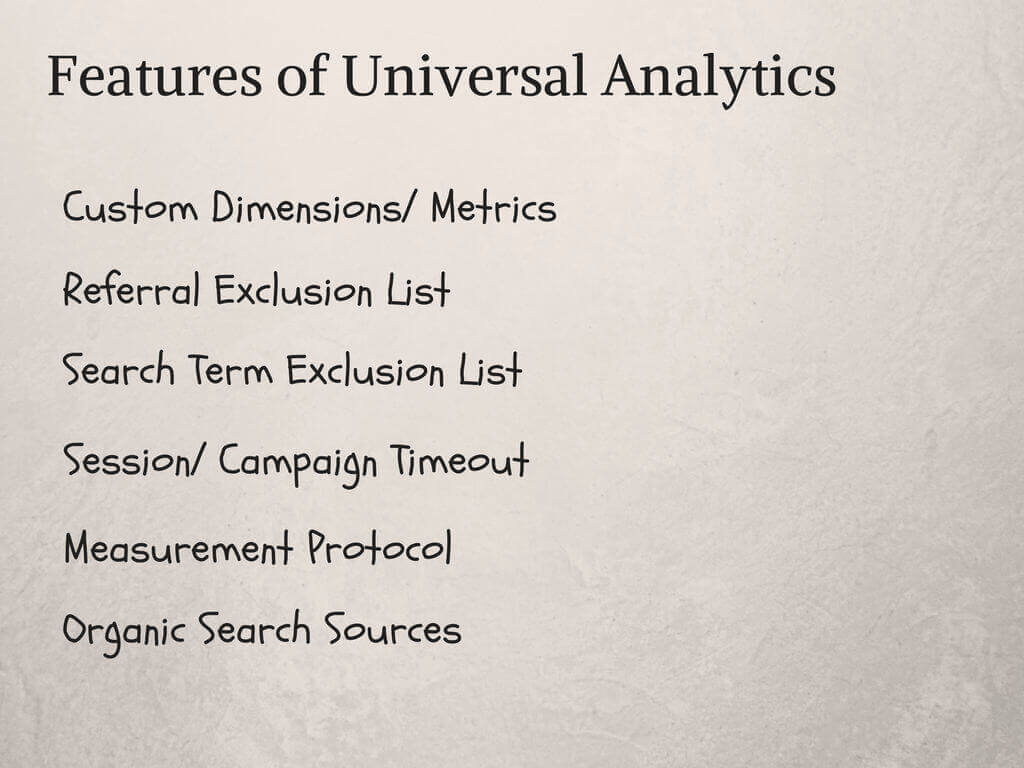
The following are the new features of Universal Analytics:
-
Custom Dimensions/ Metrics
In classical Google Analytics, we had the ability to create custom variables which would basically allow us to assign any data against a session. In Universal Analytics, Custom variables are called Custom Dimension/ Metrics and we can use this to import virtually any data into GA. UA allows you to create 20 different Custom Dimensions & Metrics.
This feature is helpful when you want to add more value to your existing GA data. For example, we recently created a USE-CASE wherein we integrated Off-Page SEO factors like Backlinks, Pagerank, Citation Flow, and Trust Flow into Google Analytics to understand the relationship between a page’s Organic Searches and Off Page Factors. (Updated 10/3/2015: Learn how you can use Custom Dimensions & Enhanced Ecommerce to generate valuable insights for your Online Store)
-
Referral Exclusion List
If you have self-referrals or visits coming from your own sub-domains/ other domains that you want GA to report under direct visits, you can use the “Referral Exclusion List
-
Search Term Exclusion List
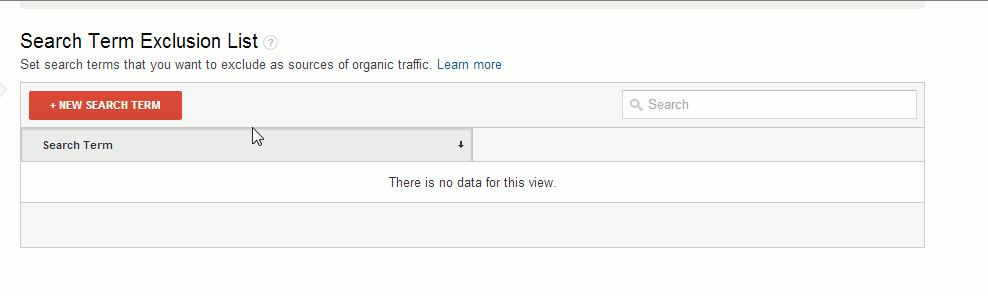
- You can use this feature to clean up your search data. For a lot of websites, visits come from branded keywords and you can make these visits report as direct visits by adding the search terms in the exclusion list. For example – ‘your company name’ is a branded search term that you may not want Google Analytics to report under organic visits but instead as a Direct Visit. So, by adding that exact search term to the exclusion list it will start reporting as a direct visit.
-
Session/ Campaign Timeout

Universal Analytics allows you to adjust your session and campaign timeout duration without adding any new special code to your website.Session timeout tells you how long your visit will last which impacts many of your metrics like page visits, conversion, etc. By default the campaign timeout duration is set to 30 mins and if the visitor does not generate any data in 30 mins, then any new event generated after that is counted as a new session. Now we can set the session timeout duration to a minimum of 1 min and a maximum of 4 hours.
Next is campaign timeout, if you are running a campaign then by default any user/ customer acquired through that campaign will be attributed to that specific campaign for 6 months. So if I visit your website today through a campaign and I revisit it after 5 months and make a purchase, then by default Google Analytics will attribute that sale to that campaign. Now, with the new UA, we can adjust the campaign timeout duration between 1 day to 2 years.
-
Measurement Protocol
The new measurement protocol feature in Universal Analytics allows you to send data into Google Analytics from other devices. You can send the data to Google Analytics from various devices like a POS System, call center, electronic sensors, etc. If you have been looking for a way to integrate your offline data into Google Analytics, measurement protocol is the best option for you.
The new feature will help businesses link their online and offline data. For example, you can track the offline & online sales of your single customer through a customer loyalty card. This will allow you to integrate your online & offline customer sales purchase behavior into a single platform and help you analyze & optimize your overall marketing efforts.
The fusion of online and offline data in GA will enable decision-makers to generate great stories about their customer’s interactions and will help them in generating relevant business insights.
Check out this classic USE-CASE of Measurement Protocol by Julian Coquet where he measures the performance of an offline store activity.
-
Organic Search Sources
If you are getting a lot of traffic from search engines that are not recognized by GA, you can add those websites to the organic search sources list.
Chapter 3: How to Upgrade to Universal Analytics?

Upgrading to Universal Analytics is fairly simple and does not require any knowledge of coding. Follow these two steps to upgrade your property to Universal Analytics.
Step 1: Transfer Your Property from Classic to Universal Analytics
The first step for upgrading your property includes transferring your property from GA to UA. Do the same by following these steps:
-
-
- Visit the Admin Section
- Select Account
- Select the Property You Want to Upgrade
- Click Universal Analytics Upgrade
-
On the page, as shown below, you will be provided information about upgrading to Universal Analytics.
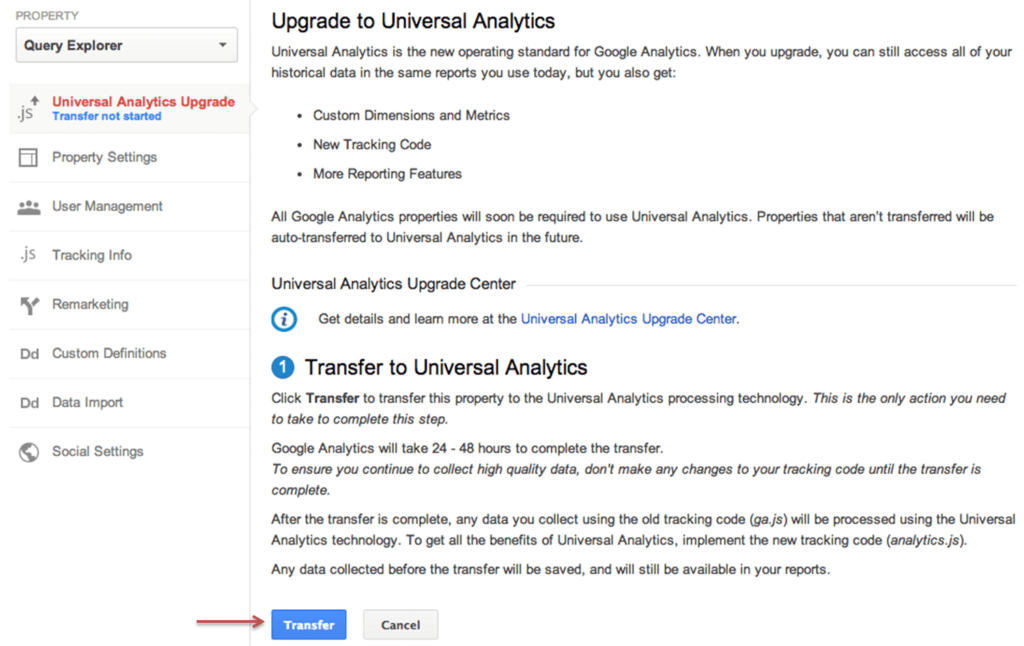
You can skip all the details and Click the blue color ‘Transfer’ button, to start the process of transferring your property to UA. It may take up to 48 hours to transfer your property to UA
Note: Some users may not see the Universal Analytics Upgrade Option. This means that Google has auto-upgraded your GA property and hence you can skip step 1 and go ahead with step 2.
Step 2: Replace the Classical Code with Universal Analytics Code
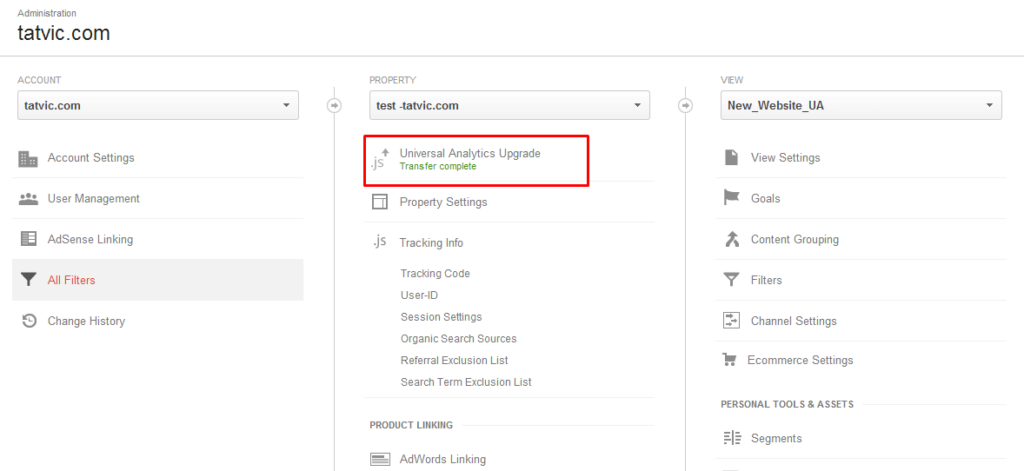
Once, your property is transferred to UA you will see a notification as shown below when you login into GA.

This confirms that your property is transferred to UA and you can visit Admin > Select Account> Select Property > Universal Analytics Transfer section to collect your new UA Tracking Code.
Your tracking code should look like this:
<script>

(function(i,s,o,g,r,a,m){i['GoogleAnalyticsObject']=r;i[r]=i[r]||function(){

(i[r].q=i[r].q||[]).push(arguments)},i[r].l=1*new Date();a=s.createElement(o),

m=s.getElementsByTagName(o)[0];a.async=1;a.src=g;m.parentNode.insertBefore(a,m)

})(window,document,'script','//www.google-analytics.com/analytics.js','ga');

ga('create', 'UA-XXXXXXXX-1', 'Yourdomainname.com');

ga('send', 'pageview');

</script>
Now, you can simply copy the code and replace it with your classical Google Analytics Code on your website. This will upgrade your property to UA.
Chapter 4: Six Tracking Codes You Need to Change When Upgrading to UA
![]()
Universal Analytics has a completely new tracking code (analytics.js) and hence all other advanced tracking codes that you were using in Classical Analytics (ga.js) need to be changed.
To make your upgradation process easy, we have listed down 6 advanced tracking codes that you may have to change while upgrading to UA. It is important to understand that if you don’t update these tracking codes, you will not see any data being reported in UA.
Event Tracking Code:
Event tracking codes are used to track various buttons (like add-to-cart, download, etc.) on your website to understand better how users are interacting with your website. Google Analytics does not track this behavior by default and you have to add a special tracking code to each button you want to track.
Before Universal Analytics, you could track the events using the _gaq object as shown below
<ahref="domain.com" onclick="_gaq.push(['_trackEvent','link','click']);">CLick Here</a>
Using _gaq however, no longer works with Universal Analytics and you have to use the following new method to track events
ga(‘send’, ‘event’, ‘category’, ‘action’,’ label’,’ value’, {‘nonInteraction’: 1});
Send an event command will send the event details to GA and the category can be a link or button name and the action can be clicked, called, etc. Value is an option that can be used to pass on a value if required. Now using the new code, the event tracking code will look like
<a href="domain.com" onclick="ga('send', 'event', 'link', 'click');">Click Here</a>
Tracking Code for eCommerce:
If you have an eCommerce store and you are selling your products through your website then in addition to basic Universal Analytics tracking code you will also have to add an eCommerce tracking code. eCommerce tracking will enable you to track various sales data like revenue, average order value, transaction, etc.
Following is the new eCommerce tracking code you will have to use in Universal Analytics and add to your thank you page:
Load the eCommerce plugin using the below code:
ga('require', 'ecommerce', 'ecommerce.js');
Code for sending Transactions data
The transaction data of your cart should be added by the following code:
ga('ecommerce:addTransaction', {

'id': '768',                     // Transaction ID. Required.

'affiliation': 'my store',   // Affiliation or store name.

'revenue': '27.50',               // Grand Total.

'shipping': '0',                  // Shipping.

'tax': '0'                     // Tax.

});
Code for Sending Items data
This code is used to push the items data present in the shopping cart:
ga('ecommerce:addItem', {

'id': '8383',                     // Transaction ID. Required.

'name': 'Blue grand shoes',    // Product name. Required.

'sku': 'MFk33',                 // SKU/code.

'category': 'Shoes',         // Category or variation.

'price': '2500',                 // Unit price.

'quantity': '1'                   // Quantity.

});
Code for Sending Data to UA
Once all the cart data is pushed in the code, the final code will push that data into Universal Analytics
ga('ecommerce:send');
The code is divided into three parts, the first part is to send transaction data, the second code is to send the item data and the third code is to send the data to GA. Add all the codes on your thank you page and GA will start collecting your eCommerce data.
How to Create Custom Dimensions/ Metrics?
In classical Google Analytics, we had the ability to create custom variables which would basically allow us to assign any data against a session. In Universal Analytics, Custom variables are called Custom Dimension/ Metrics and we can use this to import virtually any data into GA.
We recently created custom dimensions to integrate On-Page SEO Data like Title Length, and Meta description length into GA using Dimension Widening.
Follow these steps to create your own Custom Dimension:

-
-
-
Go to Admin -> Select Property -> Custom Definitions -> Custom Dimensions.
-
Give a meaningful name to the dimension
-
Define the scope of the dimension
-
Hit: The value is applied to the single hit(event, pageview, etc.) for which it has been set.
-
Session: The value is applied to all hits in a single session.
-
User: The value is applied to all hits in current and future sessions until the value changes or the custom dimension is inactive.
-
-
After defining the scope, click the Create button and you will get a code
-
-
Paste the JavaScript code of the custom dimension before the Universal Analytics pageview call.
var dimensionValue = 'abc';

ga ('set', 'dimension5', dimensionValue);
Follow these steps to create your own Custom Metric:

-
-
-
Go to Admin -> Select Property -> Custom Definitions -> Custom Metrics
-
Give a meaningful name to the metric
-
Set the formatting type and enter the minimum and maximum value
-
Formatting type: This determines how the metric value will be displayed in the reports(like integer, currency, etc).
-
Minimum Value: The minimum value of the metric that will be shown in the reports.
-
Maximum Value: The maximum value of the metric that will be shown in the reports.
-
-
Click the create button and you will receive the javascript code.
-
Paste the JavaScript code of custom dimension/metrics before the Universal Analytics pageview call.
-
-
Below is the example javascript code for custom metrics:
var metricValue = '123';

ga('set', 'metric1', metricValue);
The custom dimensions/metrics are available only in custom Reports or dashboards. To access these dimensions/metrics, one can create a custom report with these dimensions/metrics.
Tracking Code for Cross-Domain Tracking:
Cross-domain tracking allows you to track visitors across multiple domains and collect all of these websites’ data into a single property. Also, if you have a 3rd party shopping cart wherein users have to leave your website to complete the purchase, cross-domain tracking if implemented will track your users throughout the entire purchase cycle i.e. from leaving your website to a 3rd party shopping card & complete the purchase & returning back to your website.
Implement Cross-domain tracking on your website by understanding the example given below:
Consider you want to set up a cross-domain tracking code between abc1.com and abc2.com. Next, follow this steps:
Step 1: Edit the basic tracking code on the primary domain (ie abc1.com)
Step 2: Find the below line in the basic UA tracking code.
ga('create', 'UA-XXXXXXX-Y', abc1.com');
Step 3: Replace the above code with the one below:
ga('create', 'UA-XXXXXXX-Y', 'auto', {'allowLinker': true});

ga('require', 'linker');

ga('linker:autoLink', ['abc2.com'] );
Don’t forget to replace the UA-XXXXXXX-Y with your UA-ID. Also don’t forget to add the secondary domain name replacing ‘abc2.com’. You can add more than one secondary domain name to implement cross-domain with more secondary domains.
ga('linker:autoLink', ['abc2.com', 'abc3.com'] );
Step 4: Now Edit the basic tracking code on the secondary domain (i.e. abc2.com)
Step 5: Find the below line in the UA tracking code of abc2.com.
ga('create', 'UA-XXXXXXX-Y', abc2.com');
Step 6: Make the below changes to the code:
ga('create', 'UA-XXXXXXX-Y', 'auto', {'allowLinker': true});

 ga('require', 'linker');

 ga('linker:autoLink', ['abc1.com'] );
After following the above steps, you have to exclude your domain (ie. in our example abc2.com) using the referral exclusion list feature available in your Universal Analytics property.
Tracking Code for Virtual Pageviews:
Virtual pageviews help you in understanding how users interact with your website at a higher level. For example, if you have a video on your website, then with virtual page views you can track how many times a user clicked the play button or the pause button, or the duration of the time for which a user watched the video, you can also track how users are interacting with your forms embedded on your website. Virtual Pageviews code is placed at every button/event we want to track.
If you were using this feature in Google Analytics, you may have added the following _gaw.push code (bolded text) in the Classical Analytics Code:
_gaq.push(['_trackPageview', 'page path']);
Since Universal Analytics does not support _gaq.push code, you will have to change your code to as shown below:
ga('send', 'pageview', 'page path');
For example, If you want to track the play button of the video on your website as a virtual pageview your new Virtual Pageview code for UA should be like this:
<a href="#” onclick="ga('send', 'pageview', ‘/play-the-video’);">Play</a>
Tracking Code for Demographic & Interest Report
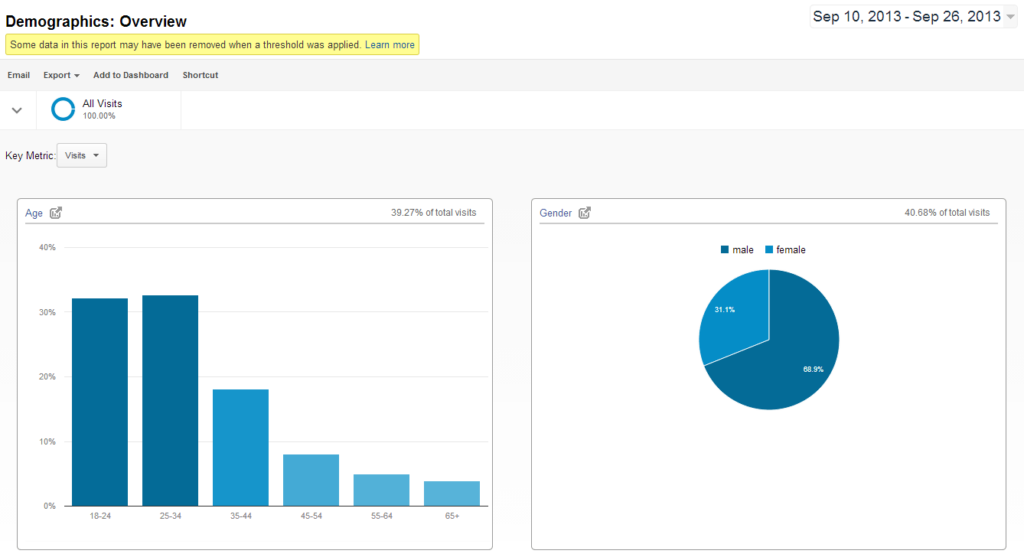
The demographic and Interest report provides insights into the age, gender, and interest of your visitor. This report is a powerful tool when you want to understand your exact audience (i.e. age and gender) and learn which type of visitors (ie. age & gender) convert more.
If you were using this feature in Google Analytics, you may have added the following DoubleClick code (bolded text) in the Classical Analytics Code:
ga.src = ('https:' == document.location.protocol ? 'https://' : 'http://') + 'stats.g.doubleclick.net/dc.js';
Since Universal Analytics does not support old code, you will have to add the following new code (bolded text) in the UA Tracking Code.
ga(‘create’, ‘UA-XXXXXX-XX’, ‘example.com’);

ga(‘require’, ‘displayfeatures’);

ga(‘send’, ‘pageview’);
The new code is fairly simple and uses GA command to send the demographic data in Google Analytics. It may take up to 48 hours for UA to start reporting the demographic data.
Chapter 5: Most Commonly Asked Questions about Universal Analytics
Google developer’s youtube channel recently answered frequently asked questions about UA. (Hint: Skip to 4:57 seconds to directly jump on to QnA Session)
We hope that the guide enables you to migrate your property to Universal Analytics and also helps you in upgrading your advanced tracking code to UA. If you have any queries or need more help, feel free to reach out to us.